SQL Database RAG App
Building a simple SQL database RAG app
I wanted to learn how to use LLMs to query data from SQL databases, so I decided to build a web app and deploy it on the cloud. Here’s how I did it.

App
GitHub
Demo
Tech Stack
- Frontend: Streamlit
- Database: SQLite
- Cloud: Streamlit community cloud
- LLM: OpenAI’s gpt-4o-mini
- Tools: LangChain
The technology stack was carefully selected to balance functionality, ease of development, and cost efficiency. Streamlit was chosen as the frontend framework due to its rapid prototyping capabilities and Python-native development environment, making it ideal for data science applications. SQLite serves as the SQL database, aligning with the project’s core objective of building an SQL database query system. The application is hosted on Streamlit Community Cloud, providing a cost-effective deployment solution with built-in CD capabilities. For the language models, OpenAI’s GPT is chosen for its proven performance and extensive documentation. The entire application is orchestrated using LangChain, which provides a comprehensive framework for building RAG applications while abstracting away much of the complexity in connecting various components.
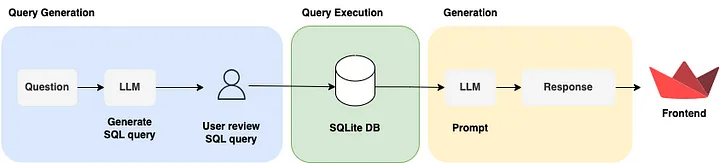
Architecture
Step 1: Setting up SQLite for Database
I started by creating the database component here to create SQLite database on-disk. To speed up the development, I used Amazon Q to generate the code and modified it.
There are 5 functions in this component, create_tables, insert_ticker_data, create_database, test_database and check_db_exist.
-
create_tables: Creates companies, price_history, balance_sheets, income_statements tables with pre-defined schema -
insert_ticker_data: Inserts the past five years of data (company info, price history, balance sheet, and income statement) from Yahoo Finance via theyfinancelibrary. -
create_database: Callscreate_tablesandinsert_ticker_datafunctions with symbol parameter values such as AAPL, NVDA and GOOG -
test_database: Queries sample data from the tables for data validation -
check_db_exist: Callscreate_databasefunction. This function is called at the Home page
Step 2: Generating SQL query
I developed the writer component here to generate SQL query.
There are 2 functions, init_llm and write_query. There is 1 class QueryOutput.
-
init_llm: Initializes LLM Open AI instance with gpt-4o-mini model -
write_query: Generates SQL query -
QueryOutput: Specifies the output required from the LLM
For write_query, this function will
- Receive the
statefor the graph - Pull prompt template from Langchain hub
- Connect to SQLite database in read-only mode to prevent unwanted modification to the database
- Update prompt with the database dialect, top k results, table info and user’s question
- Specify output required from LLM
- Invoke LLM with the updated prompt
- Return generated SQL query
Step 3: Executing SQL query
I developed the executor component here to execute SQL query.
There is only 1 function, execute_query. This function will
- Connect to SQLite database in read-only mode to prevent unwanted modification to the database
- Execute SQL query
- Return query result
Step 4: Generating answers
I developed the generator component here to generate an answer based on the query result in response to the user’s question.
There is only 1 function, generate_answer. This function will
- Initialize LLM OpenAI instance with gpt-4o-mini model
- Create prompt
- Invoke LLM with the updated prompt
- Return generated answer
Step 5: Creating RAG
I referred to this LangChain documentation Human-in-the-loop section to develop the graph component here to orchestrate the writer, executor and generator components. Below diagram shows the flow for the RAG whereby it will be interrupted before executing the query. It will continue executing the query once received input from the user.

(From LangChain documentation)
There is 1 class, Chatbot with 6 methods, build_graph, run_graph, continue_graph, update_query, string_tuples_to_markdown_table and extract_sql_headers. This class is initialized with a Langgraph graph and config to specify the thread ID for continuing the run after user inputs.
-
build_graph: Compiles RAG graph -
run_graph: Runs the RAG graph and returns the generated query -
continue_graph: Continues running the graph after receiving user inputs and returns the query result, generated answer -
update_query: Updates the graph state with the updated query -
string_tuples_to_markdown_table: Converts query result from tuples format to markdown format for displaying in the app -
extract_sql_headers: Extracts the column headers from the SQL query
For build_graph, I compiled the graph with checkpointer so that it can be continued later. I specified the graph to be interrupted before the execute_query step to wait for user inputs.
graph = graph_builder.compile(
    checkpointer=memory,
    interrupt_before=["execute_query"]
)
For run_graph, I stream the graph by providing user’s question as the input.
for step in self.graph.stream(
    {"question": question},
    self.config,
    stream_mode="updates",
):
However, for continue_graph, the graph is streamed without providing any input as it is not required.
for step in self.graph.stream(
    None,
    self.config,
    stream_mode="updates",
):
For update_query, I updated the graph state with the query to the write_query node.
self.graph.update_state(self.config, {"query": query}, as_node="write_query")
I used Amazon Q to generate string_tuples_to_markdown_table and extract_sql_headers functions and modify them.
Besides the graph component, I also developed the RAG state at here. The RAG state class is used by the RAG to keep track of its state. It is a class and has 4 attributes.
-
question: User’s question -
query: SQL query -
result: Query result -
answer: Generated answer
Step 6: Creating user interface
I developed a chatbot interface here based on Streamlit Documentation.
Firstly, the app will check if the SQLite database exist. If it is not, it will create the database by calling check_db_exist function. It will also get the OpenAI API key from the environment which provided by the user in the sidebar input.
openai_api_key = os.environ["OPENAI_API_KEY"]
There are 2 functions, update_session_state and write_chat_message. update_session_state is used to save user input to the chat history and in the session state. write_chat_message is used to output message in the chat interface for the provided role and save in the chat history.
This page will initialize the ChatBot instance when it is first loaded and output startup message. It will also set the session verification_status (variable to capture user input) as New and sql_query as blank.
This page will continuously display the chat history throughout the session.
for message in st.session_state.chat_history:
    with st.chat_message(message["role"]):
        st.write(message["content"])
When user submitted question in the chat interface and the session verification_status is New, the ChatBot will run the RAG with the user’s question. It will then respond with the generated SQL query and 2 buttons, Run query and Modify.
if prompt := st.chat_input("Ask a question about the database"):
    # User ask new query
    if st.session_state.verification_status == "New":
        write_chat_message("user", prompt)
        response = st.session_state.chatbot.run_graph(prompt)

        if response:
            write_chat_message("assistant", response)

            # Create buttons
            col1, col2 = st.columns(2)
            col1.button("Run query", key="approve_btn", on_click=update_session_state, args=['Run query'])
            col2.button("Modify", key="modify_btn", on_click=update_session_state, args=['Modify query'])

If user clicked Run query, the app will update the session verification_status to Run query and the ChatBot will continue running to execute the query and generate the answer.
# User clicked run query
if st.session_state.verification_status == "Run query":
    response = st.session_state.chatbot.continue_graph()
    if response:
        write_chat_message("assistant", response)
        st.session_state.verification_status = "New"

If user clicked Modify, the app will update the session verification_status to Modify query and Chatbot will ask user to provide modified query.
# User clicked modify query
if st.session_state.verification_status == "Modify query":
    response = "Please provide modified query."
    write_chat_message("assistant", response)

If user submitted valid query, the ChatBot will continue to execute with the new query and generate the answer. If there is error in executing the query, the app will update the session verification_status to Query invalid.
# User provided query
elif st.session_state.verification_status == "Modify query" or st.session_state.verification_status == "Query invalid":
    write_chat_message("user", "`" + prompt + "`")
    st.session_state.chatbot.update_query(prompt)

    try:
        response = st.session_state.chatbot.continue_graph()
        if response:
            write_chat_message("assistant", response)
        st.session_state.verification_status = "New"
    except:
        st.session_state.verification_status = "Query invalid"
If the session verification_status is Query invalid, the ChatBot will ask the user to submit query that is SQLite3 dialect.
# Query provided by user is invalid
if st.session_state.verification_status == "Query invalid":
    response = "Query is not supported. Please write query that is SQLite3 dialect."
    write_chat_message("assistant", response)

Step 7: Deploying to Streamlit Community Cloud
Lastly, I deployed the app to Streamlit Community Cloud from my GitHub for free hosting. I configured the repo, branch, main file path, python version (3.10) and the Streamlit secrets.

Afterthoughts
I took 1 week to develop this application. At the end of this project, I felt amazed by how RAG is able to automate SQL database query. It might help the cold-start problem of querying the database.
Lessons Learned
- How to build a Question/Answering system over SQL data
- How to build RAG with human-in-the-loop
- How to build Streamlit chat interface
Future Enhancements
- Find actual use case for this project
References
- LangChain, Build a Question/Answering system over SQL data
- LangChain, How to view and update past graph state